Table of contents
Map Tiles and Tilesets
Map Tiles
In order to understand how the map file is structured/read in, the concept of a “map tile” must be understood first.
Think of a map as a 2D grid. Each spot on the grid contains what is known as a “tile”, which is a smaller graphic that fits into the grid at a particular spot. A map is made up by joining these small tile graphics together to create one large graphic representing the entire map. For example, take a look at the below screenshot of a piece of a level:
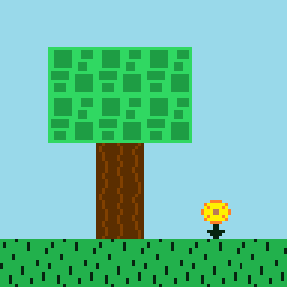
This image is actually made up of individual tiles, such as the grass tile and the sign tile:


So the image seen above of the grass, sign, cobblestone and house is actually composed together by smaller individual tiles, which is known as a tile map:

Tiles make it very easy to build up a 2D map. The Map Editor makes the process of using smaller tiles to build up the entire map very obvious since the editor allows tiles to be placed down on a grid in a desired location of the map. Each tile will have a specified index in the map at an x and y location, e.g. the first tile in the top left corner would have an index of (0,0), the tile to the right of it would be (1,0) and the tile below it would be (0,1).
The class MapTile in the Level package represents a map tile, which is really just a standard sprite with an attribute for TileType. The TileType attribute determines how the tile is treated by the game – for example, a tile type of NOT_PASSABLE means that the Player cannot walk over the tile, which is used on tiles like the pieces of the house in order for the player to not be able to walk on top of it. The available tile types are included in the TileType enum in the Level package.
Map Tileset
A tileset is a collection of map tiles. Easy enough.
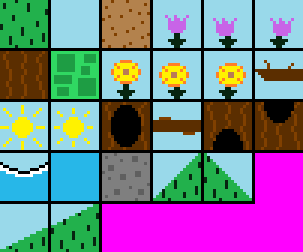
Graphic wise, a tileset defines each tile in one image. Below is the CommonTileset.png which is used by TestMap to construct its tile map. You will notice that the common tileset image is one big image with each individual map tile defined. Each map tile in a tileset must be the SAME width and height.
The Tileset class in the Level package represents a tileset, which contains a collection of MapTile objects. The way to define a tileset in this game is to create a class that extends from this Tileset class, such as the CommonTileset class in the Tilesets package. From there, the extended Tileset class must call its super class with the following:
- The tileset image file to be used –
CommonTilesetuses theCommonTileset.pngfile shown above - The width and height for every tile in the tileset –
CommonTilesetspecifies that each tile graphic in the above image is 16x16 - The tileset scale, which is how much each tile in the tileset should be scaled by when drawn to the screen –
CommonTilesetspecifies a scale of 3, meaning each tile will be 48x48 pixels on screen
Additionally, the Tileset class method defineTiles must be overridden and have actual defined MapTiles added to it.
Adding a map tile to a tileset
The setup for overriding the defineTiles method in a Tileset subclass looks like this:
@Override
public ArrayList<MapTileBuilder> defineTiles() {
    ArrayList<MapTileBuilder> mapTiles = new ArrayList<>();
    return mapTiles;
}
From here, MapTiles can be added to the ArrayList – kind of. This method actually defines a type of MapTileBuilder. The class MapTileBuilder, which can be found in the Builders package, essentially defines a MapTile but does not instantiate it yet. It’s not too important to fully understand this if you are unfamiliar with the builder pattern (you can read more about it here). I recommend that you use the already existing code in the CommonTileset class as a reference to guide you in adding a new MapTile to a tileset.
The following example in the defineTiles method adds the grass tile to the tileset, which is the first graphic in the top left corner of the above shown CommonTileset.png file:
@Override
public ArrayList<MapTileBuilder> defineTiles() {
    ArrayList<MapTileBuilder> mapTiles = new ArrayList<>();

    // grass
    Frame grassFrame = new FrameBuilder(getSubImage(0, 0))
            .withScale(tileScale)
            .build();

    MapTileBuilder grassTile = new MapTileBuilder(grassFrame)
            .withTileType(TileType.NOT_PASSABLE);

    mapTiles.add(grassTile);

    // ...

    return mapTiles;
}
Whew, that’s a bit confusing to look at I know! But the formatting here can be copied for every subsequent tile, so it can be treated as a template.
To start, a new Frame (details on Frame class here) must be created to represent the grass tile’s graphic (grassFrame). The FrameBuilder class is used to build a Frame instance. In the constructor, getSubImage(0, 0) takes a piece of the tileset image (CommonTileset.png), which is the grass tile graphic. Since CommonTileset defines the tile width and tile height as 16x16, the getSubImage method will start at location (0, 0) on the image and then take 16 pixels in both directions and return the resulting subimage, which is how the individual grass tile graphic gets returned.
Then, a MapTileBuilder class instance must be created to represent the actual MapTile (although it won’t instantiate the MapTile at this time). Here is where the grass tile (grassTile) is given the TileType NOT_PASSABLE, meaning the player cannot walk or fall through it (it is “solid”).
Finally, the tile is added to the mapTiles list.
Let’s do one for the sky tile now:
In the CommmonTileset.png image shown earlier, the sky tile is located to the left of the grass tile at index (0, 1). With that slight difference in mind, nearly everything else will be the same for the sky tile as the grass tile:
@Override
public ArrayList<MapTileBuilder> defineTiles() {
    ArrayList<MapTileBuilder> mapTiles = new ArrayList<>();

    // grass
    Frame grassFrame = new FrameBuilder(getSubImage(0, 0))
            .withScale(tileScale)
            .build();

    MapTileBuilder grassTile = new MapTileBuilder(grassFrame)
            .withTileType(TileType.NOT_PASSABLE);

    mapTiles.add(grassTile);

    return mapTiles;

    // sky
    Frame skyFrame = new FrameBuilder(getSubImage(0, 1))
            .withScale(tileScale)
            .build();

    MapTileBuilder skyTile = new MapTileBuilder(skyFrame)

    mapTiles.add(skyTile);

    // ...

    return mapTiles;

}
Unlike with the grass tile, the sky tile is not “solid” and can be passed through by the player. To achieve this behavior, its TileType needs to be set to PASSABLE. This is the default tile type, so it does not need to be specified, but it can be by adding .withTileType(TileType.PASSABLE).
Adding an animated map tile to a tileset
Tiles can be animated! How fun! Currently, the CommonTileset contains two animated tiles: the yellow flower and the purple flower To set this up, the tileset image file must have a separate image for each frame in the tile’s animation.
For example, below are the frame tiles used for the flower (three different frame images):


The end goal is the following animation:

The code for this animated tile looks like this:
// purple flower
Frame[] purpleFlowerFrames = new Frame[] {
        new FrameBuilder(getSubImage(0, 2), 65)
                .withScale(tileScale)
                .build(),
        new FrameBuilder(getSubImage(0, 3), 65)
                .withScale(tileScale)
                .build(),
        new FrameBuilder(getSubImage(0, 2), 65)
                .withScale(tileScale)
                .build(),
        new FrameBuilder(getSubImage(0, 4), 65)
                .withScale(tileScale)
                .build()
};

MapTileBuilder purpleFlowerTile = new MapTileBuilder(purpleFlowerFrames);

mapTiles.add(purpleFlowerTile);
Instead of just one Frame being created, an array of Frame instances is defined. Each Frame specifies its own subimage location, and its delay value. The delay value is the number of game cycles that need to pass before the animation will transition to its next frame. Each frame in the above animation has a delay of 65 game cycles. This animation defines these four frames in the following order:
After each animation cycle, the animation will loop back to the beginning again. If the delay is set to -1, the animation will never move on from a frame without something else explicitly telling it to.
Tile Types
The available tile types are defined in the TileType enum, and include:
- NOT_PASSABLE – player cannot pass through it, they are “solid”, such as the grass tiles
- PASSABLE – player can pass through it, such as the sky tiles
- JUMP_THROUGH_PLATFORM – the player can walk on top of it and cannot pass through it when coming downwards from above, but can pass through it when coming upwards from below, such as the tree branch tiles
- WATER – the player can pass through it; this tile type is just for informational purposes so an entity can react to touching it (which the player does by changing to its swim animation)
- SLOPE – the tile is a slope (incline) that the player can walk up or down; read more about slopes here.
Slope Tiles
A staple of the platformer genre, slope tiles (inclines) allow for creating more dynamic and interesting levels. Believe it or not, implementing slopes in a 2D space is rather complex, and is probably one of the most logic-heavy features in this entire project.
How slope tiles work
The entire game is based around rectangles – all collisions use rectangle math, all map tiles are a tiny rectangle, the player is represented as a rectangle, etc. Slopes, on the other hand, are clearly not able to be represented as pure rectangles due to their shape/properties. As a result, an entirely new collision system needed to be implemented to allow slopes to work correctly.
For example, look at the below slope tile:

As the player walks forward (left or right) while on the ground, they are expected to follow the incline.
This is clearly not something that can be achieved with simple rectangle math alone.
Internally, each slope tile has a tileLayout property (represented by the TileLayout class), which has a 2D array property that represents each pixel of the slope tile. The 2D array specifies which pixels of the slope are “passable” and while pixels of the slope are “not passable”. Below is an example of what a slope’s 2D array could look like:
0 0 0 1
0 0 1 1
0 1 1 1
1 1 1 1
Notice how the 1s (not passable) create a representation of the slope. In the Utils class SlopeTileLayoutUtils, there are methods for creating tile layouts of different angled slopes, with scale support.
Slopes are also given a specified direction (left or right) based on which way the slope is facing.
Putting this all together, defining the above 45 degree slope looks like this (as seen in the CommonTileset class):
// left 45 degree slope
Frame leftSlopeFrame = new FrameBuilder(getSubImage(3, 3))
        .withScale(tileScale)
        .build();

MapTileBuilder leftSlopeTile = new MapTileBuilder(leftSlopeFrame)
        .withTileType(TileType.SLOPE)
        .withTileLayout(SlopeTileLayoutUtils.createLeft45SlopeLayout(spriteWidth, (int) tileScale));
From here, in order to make slopes work, the engine runs additional code is included during collision checks to determine if a slope tile was collided with. Essentially, slope tiles are initially treated by the regular collision engine as completely “passable”. After an entity moves, if they are inside of a slope tile, they will then be repositioned based on the tile layout. The entity’s current position inside the slope tile will be calculated against the tile layout, and if the entity is on a 1, they will be pushed upwards until they are on a 0.
There is also some extra logic to allow for an entity to “stick” to a slope when walking down it, as well as ensure an entity doesn’t fall through a slope.
Slope angles and layouts
The engine supports slopes with different angles and layouts. Included already are slopes of a steady incline of both 45 degrees and 30 degrees, but any angle and layout should work.
Swapping out existing tiles with the same slope layout will work fine.
How to create a new slope angle or layout
The key to creating a new slope angle or layout is to get the 2D array representation of the slope to properly represent it. This can be more challenging than it sounds at times, as tiles are scaled up by the engine, and a standard matrix scaling does not work with tile layouts.
For example, say I have the following slope tile layout:
0 0 0 1
0 0 1 1
0 1 1 1
1 1 1 1
If I were to scale this to be double in side and used regular matrix math, I would end up with the incorrect result of this:
0 0 0 0 1 1 1 1
0 0 0 0 1 1 1 1
0 0 1 1 1 1 1 1
0 0 1 1 1 1 1 1
1 1 1 1 1 1 1 1
1 1 1 1 1 1 1 1
The issue here is that this type of scaling messes with the inclines actual angle/trajectory, which will cause the player to jump extra pixels and will create “choppy” movement.
Instead, the tile layout should match the original incline while still being scaled, and should look something like this:
0 0 0 0 0 1 1 1
0 0 0 0 1 1 1 1
0 0 0 1 1 1 1 1
0 0 1 1 1 1 1 1
0 1 1 1 1 1 1 1
1 1 1 1 1 1 1 1
This is where the TileLayout methods in the SlopeTileLayoutUtils come in. Their job is to properly create a tile layout and incorporate the desired scaling to esnure the layout comes out correctly.
The methods may look a bit convoluted, but they are really just doing some standard 2D array manipulation to place 0s and 1s in the correct spot. I recommend creating one of these methods outside of this project to ensure the logic works and the layout looks as desired before putting it into the game, as it is must easier to test the logic without having to run the entire game every time.
Slope rules
If an entity enters a slope from the bottom while grounded, they will be “lifted” to the next available 0 space in the tile layout upwards from where they currently are in the tile. This means that even if the next 0 space is ten pixels up, the entity will be “teleported” there.
If an entity enters the top of a slope while grounded, logic will “stick” them to the slope in order to keep them grounded and walking downwards.
There is special logic in place to allow an entity to stand on the tip of a slope, as well as allow an entity to be between two slopes at once.
Warning: Only a slope’s incline is factored into collisions. This means that the other areas of the slope are considered “passable” and will teleport an entity weirdly if walked through. It is preferred to ensure a slope either naturally transitions into another slope, or into a solid block. If a standalone slope is required, a technique is to create an additional map tile that has one pixel thick bounds that can be used to cover the exposed non-incline sides.